O365 Classic Stream Migration
Overview
Microsoft has defaulted videos being stored in SharePoint documet libraries which have a superior feature set relative to the Classic Stream experience. As I write this, we are in the final weeks of support for Classic Stream which is scheduled to be turned off April, 15, 2024 after a postponement from Auguest, 2023. I think they mean it this time.
The good news is that new vidoes from Teams meetings recordings and other video recordings are now stored in Stream on SharePoint (or just “Stream”), and it has been this way for over a year. This means that the recordings that will disappear in April, 2024 are at least a year old. My experience is that most such videos have little value, but there are some gems worth keeping. How can we keep these?
Classic Stream Migration
The recommended migration page found via the admin O365 admin center which lands you at this page: https://admin.microsoft.com/#/featureexplorer/migration/StreamMigration which requires SharePoint or Global admin role. This page shows a list of Classic Stream containers. You can select the containers and then click Scan to see an overview of each container, but not the individual files. How can we see all the files?
Run PowerShell Report - Optional
Microsoft has made a PowerShell script to report all the videos in each container which can be a big help in determining which containers to migrate and which to abandon. https://learn.microsoft.com/en-US/stream/streamnew/migration-details
You do have to get your hands a little dirty as the script requires some edits:
Prerequisites
- Get the script - Navigate to Stream Admin Settings -> Stream Migration -> Reports and download the script - https://web.microsoftstream.com/admin/?view=MigrationReports
- Tenant Id - one place you get this is via Entra ID: https://portal.azure.com/#view/Microsoft_AAD_IAM/ActiveDirectoryMenuBlade/~/Overview
- The refreshtoken. The documentation does not work for Chrome. Instead of trying to figure that out, I used Edge.
The rest of the “Stream migration tool reports” page has the rest of the steps.
Reviewing and sharing this report with the end users who may not have direct access to the videos can help with the decision of which containers to migrate.
The Report
- The CSV lands in a folder two levels deeper than the specified output, StreamClassicVideoReport\ with a filename corresponding to the timestamp.
- I find it easier to work by saving as an Excel workbook and inserting a table to allow filters and sorting.
- It may help to make a summary of the containers.
Migration Preparation
- Note that it is not necessary to delete obsolete or unwanted containers. They will go away in a few weeks.
Set Destinations
The migration process creates a folder called “Stream Migrated Videos” in chosen destination and puts all the container videos matching the filter there.
- Choose conatiner(s) to migrate from the Scans section and click “Add to migration”.
- Sometimes the filters can help, but usually I “Use default settings”. Keep in mind that you only get one destination per container; you cannot use the filter for different destinations. Click continue.
- Click on Migrations.
- Before migrating a container, it needs a destination of a OneDrive account, SharePoint site or Team channel. User and Group containers have a default destination which you can override. StreamOnlyGroup and CompanywideChannel (which is sometimes abbreviated as CWC in MS documentation) containers will need an explicit destination. You can click on the container and edit the destination.

- IMPORTANT! Once you migrate a container to a destination, that’s it. You cannot change the destination even if you delete the migration and re-add it from scans.
- If you have a lot of containers to migrate, you may find it easier to set the destinations via CSV file(s). Click Upload destinations > MigrationDestinations (CSV).
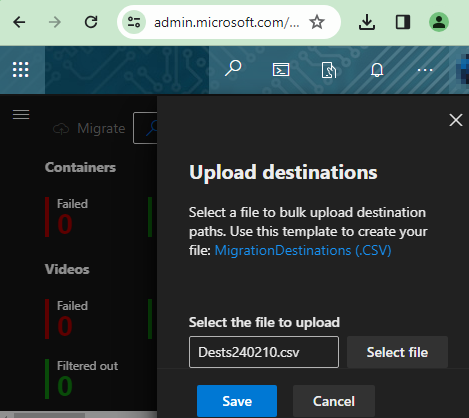
- Edit the CSV file which is pre-populated with all the containers which have not yet been migrated and thus do not have a locked-in destiation.

- Click Select file > Choose CSV file > Save
Migrate
- You can schedule the migration time on individual containers by clicking on each container in the Migrations tab and clicking Edit under “Scheduled start time”.
- Or select containers ready for migration and click Migrate.
- Be aware that the migration process may break inheritance at the destination and use unique permissions to maintain users’ original access.
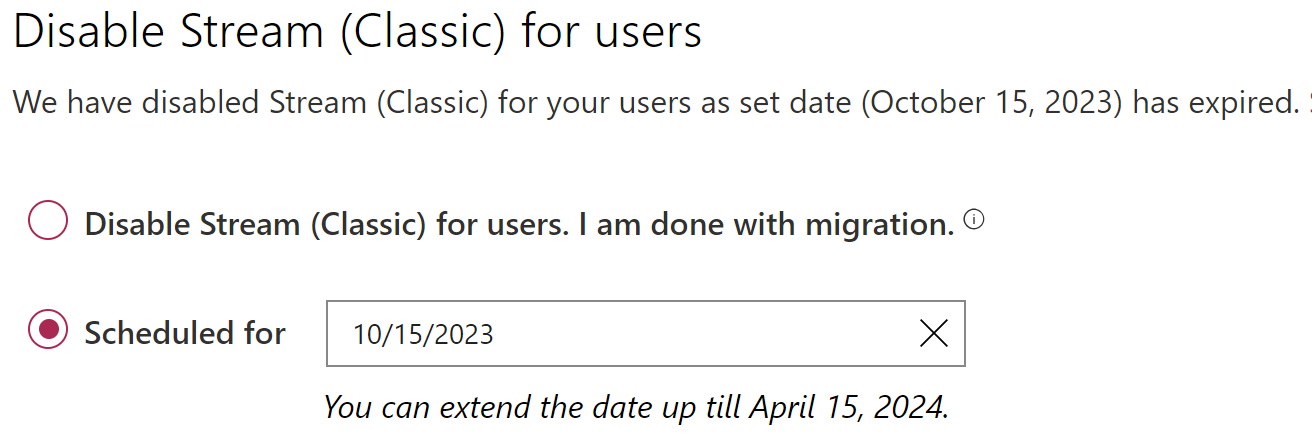
Extend Classic Stream
Stream and Global admins can view Classic Stream videos. If you want end users to be able to view their Classic Stream videos perhaps to help decide which containers to migrate, you can change it here https://web.microsoftstream.com/admin/?view=MigrationSettings
Communications
- Be aware of how end-users may be affected.
- While many videos in SharePoint page web parts will continue to work after migration if the migration is done properly. However, you should ask users to check their videos in SharePoint after the migration.
- Users may be surprised to find a new “Stream Migrated Videos” in their OneDrive, Teams or SharePoint area and may appreciate a heads up on this.
- Remember, this migration is not just about moving files; it’s about empowering your users with a robust video platform that enhances collaboration and productivity.